 Skip to content
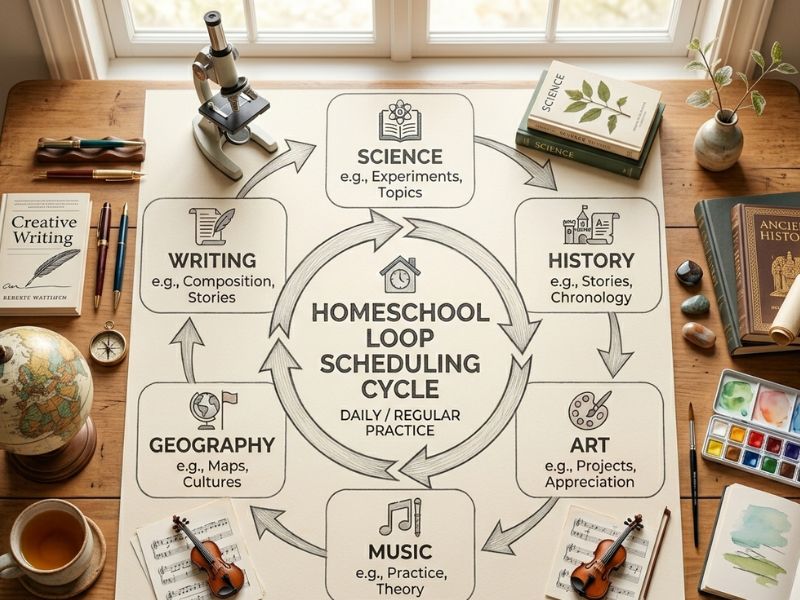
Things looked fine on paper, but our homeschool days told a different story. We rushed through lessons, skipped subjects, and still felt behind. I kept adjusting the plan, yet nothing truly worked in real life.
That is when I tested loop scheduling for homeschool. Instead of chasing a perfect timetable, I used a flexible system built around our pace. It helped us stay consistent, reduce pressure, and finally bring balance to our daily learning.
- What is Loop Scheduling?
- How Loop Scheduling Works
- What a Loop Scheduling Day Looks Like
- Why Use a Loop Schedule?
- Why Loop Scheduling Works
- Loop Scheduling vs Block Scheduling
- How to Create a Loop Schedule
- Loop Schedule Ideas
- Loop Schedule Examples
- Common Loop Scheduling Mistakes
- When Loop Scheduling May Not Work
- Daily + Loop Hybrid System
- Simple Loop Schedule Template
- Frequently Asked Questions
- Conclusion
What is Loop Scheduling?

Loop scheduling is a simple way to organize your homeschool subjects. Instead of assigning subjects to specific days, you create a list. You go through that list one by one.
When your day ends, you stop. The next day, you continue from where you left off.
This means:
- No pressure to “finish everything”
- No need to reshuffle missed subjects
- Learning continues naturally
Think of it like a playlist. You don’t restart the list every day. You just continue from the last point.
How Loop Scheduling Works

Loop scheduling works in a simple rotation system. You pick a list of subjects and move through them step by step.
Loop scheduling is usually used for non-core subjects like science, history, and art, while core subjects like math and reading are done daily.
Here is how it looks in real life:
- Start your day with core subjects (like math and reading)
- Move to your loop list (science, history, art, etc.)
- Stop when your time is over
- Continue the next day from the same point
This means even on busy days, your schedule does not break.
Example flow:
- Day 1 → Science, History
- Day 2 → Art, Geography
- Day 3 → Music, Projects
You do not assign these to fixed days. You just follow the loop. If you want to understand how a full day can be structured around this approach, you can explore this detailed guide on homeschool daily routines.
What a Loop Scheduling Day Looks Like
A loop schedule becomes easier to understand when you see it in a real homeschool day. The goal is not to finish everything. The goal is to keep moving forward without stress.
| Time | Subject | Type |
|---|---|---|
| 9:00 | Math | Daily Core |
| 9:45 | Reading | Daily Core |
| 10:30 | Science | Loop Subject |
| 11:15 | History | Loop Subject |
| Next Day | Continue with the next loop subject | Flexible |
Why Use a Loop Schedule?
Loop scheduling solves a common homeschool problem, falling behind.
Key benefits:
- Less stress
You no longer feel like you are failing when something gets skipped - More flexibility
Busy days do not break your routine - Better balance
All subjects get attention over time - Easy to manage
Planning becomes simple and quick - Works for real life
It fits your family’s natural rhythm
This method helps you focus on progress instead of perfection.
Why Loop Scheduling Works
Loop scheduling works because it removes the pressure to complete every subject on a fixed day. Instead of feeling behind, you simply continue from where you stopped.
- It reduces daily decision stress.
- It helps subjects get attention over time.
- It makes interruptions easier to handle.
- It gives structure without making your day feel strict.
Loop Scheduling vs Block Scheduling
Many parents compare different homeschool systems before choosing one.
| Feature | Loop Scheduling | Block Scheduling |
|---|---|---|
| Structure | Flexible rotation | Fixed time blocks |
| Missed work | Continue next day | Must reschedule |
| Stress level | Low | Medium |
| Best for | Flexible families | Structured learners |
If your days feel unpredictable, loop scheduling is usually the better choice.
How to Create a Loop Schedule
Creating a loop schedule is simple. You do not need complicated tools or planning.
Step 1: Choose your subjects
Pick subjects that do not need daily practice
Example: science, history, art
Step 2: Make a list
Write them in order. This becomes your loop
Step 3: Set daily core subjects
Keep math and reading outside the loop
Step 4: Start your loop
Work through subjects one by one
Step 5: Stop when time ends
Do not force completion
Step 6: Continue next day
Resume from the previous subject
Loop Schedule Ideas
Here are some ideas you can include in your loop:
- Science
- History
- Geography
- Art
- Music
- STEM projects
- Life skills
- Reading projects
You can also group subjects:
- Creative loop (art + music)
- Academic loop (science + history)
This keeps your homeschool routine fresh and engaging.
Loop Schedule Examples
Example for Elementary Student
- Math (daily)
- Reading (daily)
- Loop:
- Science
- History
- Art
- Geography
Day 1 → Science
Day 2 → History
Day 3 → Art
👉 This works well for younger children who need variety.
Example for Middle School Student
- Math (daily)
- Writing (daily)
- Loop:
- Science
- History
- Coding
- Art
👉 Total learning time: around 3–4 hours per day
👉 Helps balance multiple subjects without overload
Example for High School Student
- Core subjects daily
- Loop:
- Advanced science
- Literature study
- Research projects
- Electives
👉 Focus is more on depth and independent learning
Common Loop Scheduling Mistakes

Loop scheduling is simple, but small mistakes can make it ineffective.
- Making the loop too long
A long list means some subjects take too long to repeat - Not tracking progress
If you don’t mark your place, you may forget where to continue - No priority subjects
Some subjects need more attention than others - Turning it into a strict schedule
This removes the flexibility that makes loop scheduling work
When Loop Scheduling May Not Work
Loop scheduling works for many families, but not for everyone.
- If you prefer a strict daily timetable
- If your child needs a fixed routine
- If your curriculum requires daily completion
- If flexible planning feels difficult
In these cases, a structured schedule may work better.
Daily + Loop Hybrid System
Many homeschool families use a mix of structure and flexibility.
- Daily subjects (core):
Math, Reading, Writing - Loop subjects:
Science, History, Art, Projects
This system gives you the best of both worlds consistency and flexibility.
Simple Loop Schedule Template
You can use this basic template to start:
| Order | Subject |
|---|---|
| 1 | Science |
| 2 | History |
| 3 | Art |
| 4 | Geography |
| 5 | Music |
👉 Start from the top
👉 Stop when your day ends
👉 Continue from the next subject the next day
Frequently Asked Questions
What is loop scheduling in homeschool?
It is a flexible method where you rotate subjects instead of assigning them to fixed days.
Is loop scheduling better than a daily schedule?
It works better for families who need flexibility in their routine.
How many subjects should be in a loop?
Start with 4–6 subjects to keep it simple and effective.
Can you use loop scheduling in high school?
Yes, it works well for managing electives and non-core subjects.
Conclusion
Over time, I realized that the right system matters more than a perfect plan. With loop scheduling for homeschool, we stopped worrying about missed work and focused on steady progress. From my experience, a flexible structure creates better results and makes homeschooling feel calm, manageable, and effective.